OAuth 2.0 with RestSharp for WPF
oauth restsharp wpf csharp
A few weeks ago I had a frustrating time implementing an API where I needed to use OAuth 2.0. Since this was something I had never done before, I began to do research and tests, but I realized that most of the written tutorials I found were for OAuth 1.0 and not for OAuth 2.0.
I ended up asking a colleague on another team for help and they recommended I use RestSharp. Later that day I found Digital Ocean’s tutorial on OAuth 2.0. It’s as if my brain had clicked and suddenly all the pieces of the puzzle fit. I was able to make some quick calls and connect to the API.
Afterward, I sat down with myself and thought “should I do a blog post regarding this? To help future devs who may be in a situation similar to mine a few weeks ago? The answer is obvious because here’s the blog post!
Short and simple explanations!

OAuth
“An open protocol to allow secure authorization in a simple and standard method from web, mobile and desktop applications.” (https://oauth.net)
In other words, it allows secure conversations between applications in order to protect data. Companies use this in order to provide privacy of a user’s data. Depending on what the calling application may need, the company may ask the user for permission to share said data. Once you’ve obtained the permission, you’ll receive a token which will identify you as a legal alien and allow you to make calls and obtain the super sensitive data.
Sorta like obtaining your legal residence in a country, where after a bunch of paper work, you’ll now be able to do transactions that allow you to get in debt once you present your token (permanent residency visa).

RestSharp
One of the most popular HTTP client libraries for .NET. It features automatic serialization and deserialization, request and response type detection, a variety of authentication and other useful features” (https://restsharp.dev).
My personal experience has been very positive, using RestSharp made my OAuth 2.0 implementation a breeze. I highly recommend it.
So, with that out of the way, let’s dive in into code!
The actual tutorial
In your project, make sure to download RestSharp and if you don’t have it: Newtonsoft.JSON (the original one!).

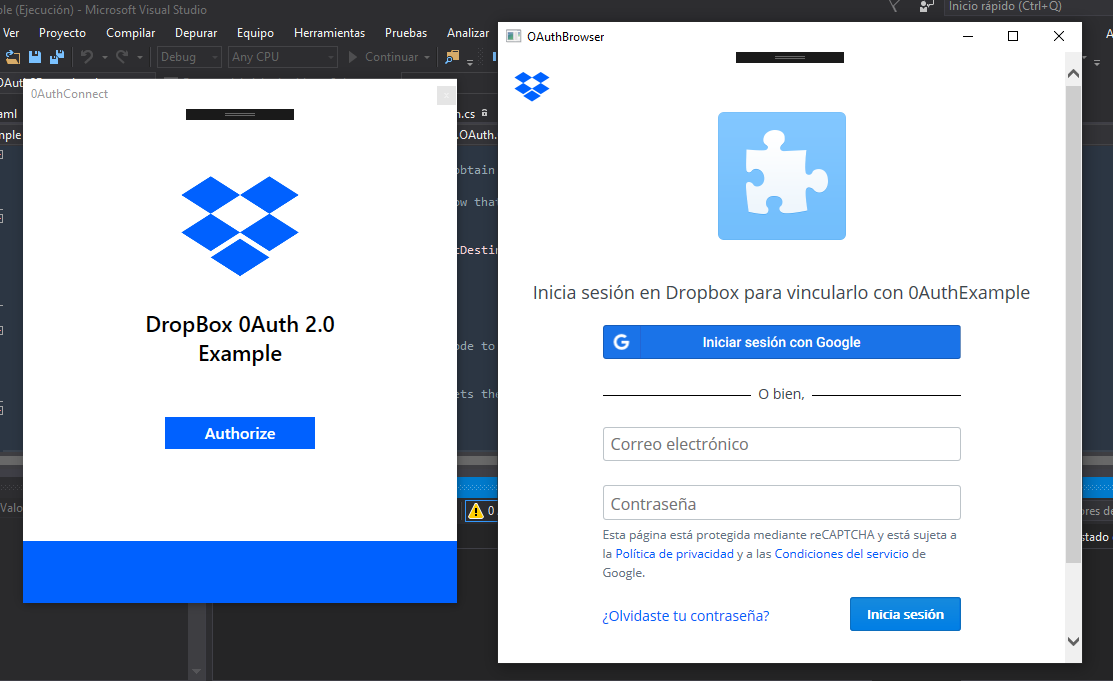
One of the first things that you’ll find out when researching how to implement OAuth in WPF is that you need a web browser. So make sure to create one in your window. In my case, I decided to create two windows: one where I would make the call and another to receive the token.
Like this:

As you can see, for this example we’re going to try to get authorization to use Dropbox data. I decided to use Dropbox’s API because compared to my other options, it was much easier to connect to.
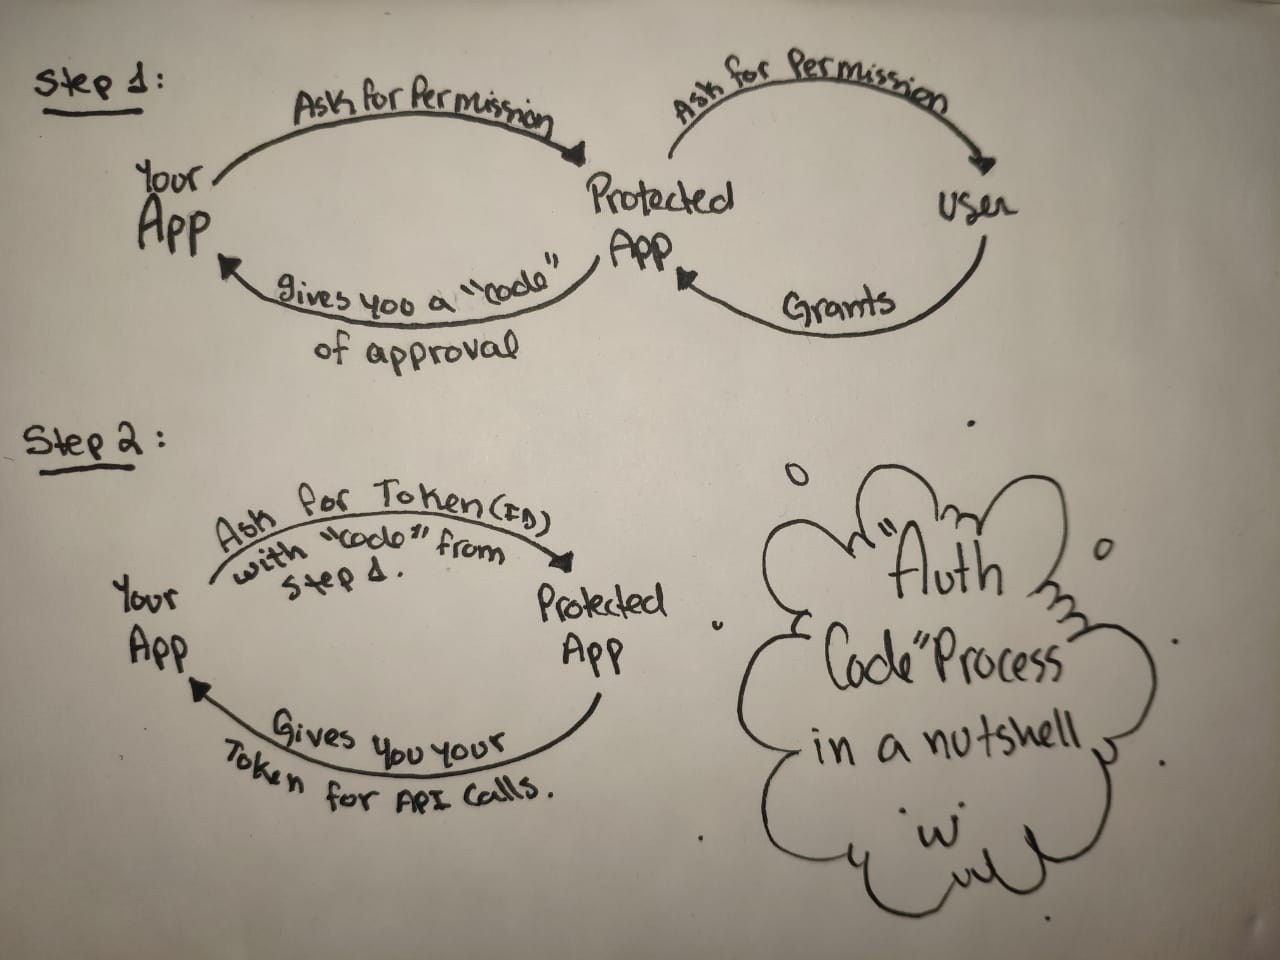
What I showed in the picture is one of the flows that Dropbox offers. There are two other flows, which I won’t go into too much detail because I think the flow I’ll explain is one of the most popular, or minimum it’ll help you easily find out how to do the other ones.
This flow is normally called “authorization code”.
So we need the user’s permission granted “authorization code” to obtain the token (our legal alien id) so that we can use to make calls to an API with OAuth.
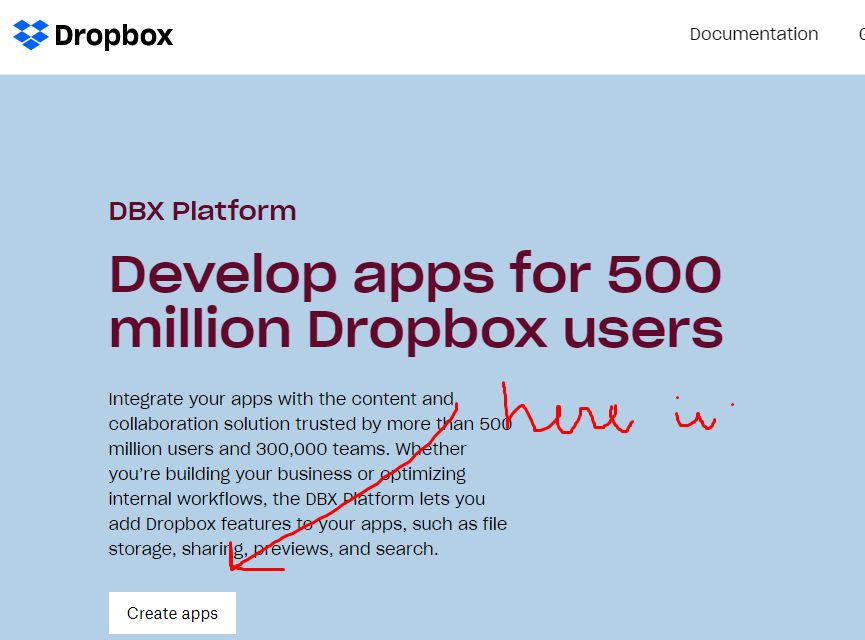
But before we get to show the code behind these windows, we need to get our app registered in Dropbox.
Head on over to https://www.dropbox.com/developers and register your app easily. I specifically chose Dropbox because its process was the most simple. I felt a bit overwhelmed with Instagram’s and Google’s 😅 (keep in mind that I usually do these blog posts at night after work, my brain is tired!).

Once you finish registering, you’ll need to also register a redirect URL. What is that you ask? Ah my friend, it took me forever to understand that once the user gives you permission to access their data, Dropbox HAS to send that response somewhere (🐌🧠). The cool thing is, since we’re using a web browser in a WPF app the redirect URL can simply be: http://localhost:3030

Save that App Secret and App ID somewhere safe! We’ll need those to connect to Dropbox!
The authorization code flow will be done like this in the app:

So, lets start by creating a configuration class where you can store your credentials (you can change this approach depending on your project’s necessities) like so:
namespace OAuth2Example
{
    public static class OAuthConfiguration
    {
        // The link is found in the following
        // documentation site: https://www.dropbox.com/developers/documentation/http/documentation
        private static string AuthCodeUrl = "https://www.dropbox.com/oauth2/authorize";
        public static string TokenUrl = "https://api.dropboxapi.com/oauth2/token";
        // *You* provide this one, you need to register it in the app's site. In our case, a localhost will do.
        public static string RedirectUrl = "http://localhost:3030";
        // These are provided by the site when you register your application. They're secret so don't give it away ~
        public static string AppKey = "[APP KEY GOES HERE]";
        public static string AppSecret = "[APP SECRET GOES HERE]";
        // A small method to return the destinationURL, just to make it easier for whoever is calling this class.
        public static string GetDestinationURL()
        {
            return AuthCodeUrl + ($"?client_id={AppKey}&redirect_uri={RedirectUrl.ToString()}&response_type=code");
        }
    }
}
Now, in the code behind for the OAuth browser we need to create a “loaded” event to navigate to our Destination URL (Dropbox) and a “navigated” event to catch the response returned in the Redirect URL:
public partial class OAuthBrowser : Window
    {
        // THINGS YOU WILL NEED TO MAKE THIS WORK:
        // 1. The authorization site's URL.
        private string DestinationUrl;
        // 2. Where the authorization site will go to after you've been authorized.
        private string RedirectUrl;
        // 3. The authorization password that will let you get a token to make other API calls.
        public string AuthCode { get; set; }
        /// We force the calling method to provide this information to
        /// minimize dependencies and make it reusable.
        /// 0-0 my brain just works like this.
        public OAuthBrowser(string destinationUrl, string redirectUrl)
        {
            InitializeComponent();
            // it's a good idea to make sure the string aren't null or empty when doing these types of things.
            // adding an exception throw here is a good way to go about it.
            DestinationUrl = destinationUrl;
            RedirectUrl = redirectUrl;
        }
        /// <summary>
        /// After the browser loads, we navigate to our destination URL which needs the app key and the type of
        /// response needed to give us the token.
        /// Note: this varies from API to API, so be sure to read the documentation for it!
        /// </summary>
        private void OAuthBrowser_Loaded(object sender, RoutedEventArgs e)
        {
            wb0Auth.Navigate(DestinationUrl);
        }
        /// <summary>
        /// Event to obtain the authorization token sent by the authorization site.
        /// </summary>
        private void wb0Auth_Navigated(object sender, NavigationEventArgs e)
        {
            // I grabbed this method and modified it a bit (to fit my style) from:
            // https://stackoverflow.com/questions/20353702/how-to-create-facebook-oauth-in-wpf-c-sharp
            // The author is a savior. :sparkles:
            if (!e.Uri.ToString().Contains("?code"))
            {
                // always try to return as fast as you can. #needforspeed
                return;
            }
            // else, get the auth code!
            string[] parts = e.Uri.ToString().Replace("?", "").Split('=');
            if (parts[0].Contains("code"))
            {
                AuthCode = parts[1];
                // break;
            }
            this.Close();
        }
    }
With that done, we need to actually create the method that’ll call the browser. I decided to create a class that’ll contain all the authenticator code, I called it “OAuthCalls”. Very creative. I know, but, it’s readable. In it you can find this code:
public static OAuthToken AuthToken;

/// <summary>
/// Opens a browser that navigates to a specific url to obtain permissions from a user to access their data.
/// </summary>
/// <returns>An authentication code that lets the API know that we have permission from the user to access their data</returns>
public static string GetAuthCode()
{
    var browser = new OAuthBrowser(OAuthConfiguration.GetDestinationURL(), OAuthConfiguration.RedirectUrl);
    browser.ShowDialog();
    return browser.AuthCode;
}
In our main window, we add an event for the authorization button like so:
private void btnAuthorize_Click(object sender, RoutedEventArgs e)
        {
            //  we call the method to get the authentication code needed to obtain the authorization token.
            string authCode = OAuthCalls.GetAuthCode();
            // with the authCode we set the authetication token to use in api calls to dropbox.
            OAuthCalls.SetAuthToken(authCode);
            if (OAuthCalls.AuthToken != null)
            {
                // we let the user know they were authorized and disable the authorization button.
                tbAuthMessage.Visibility = Visibility.Visible;
                btnAuthorize.IsEnabled = false;
                btnAuthorize.Foreground = new SolidColorBrush(Colors.Gray);
            }
        }
Lastly, in the “OAuthCalls” class we add the following method, this is the part where actually use RestSharp! it makes it super easier to call APIs, serialize or deserialize objects returned by them. In this case Dropbox was being a bit funny so I had to use Newtonsoft’s JSON properties so Restsharp could de-serialize it correctly.
/// <summary>
/// Makes a request to the API with our authentication code to ask for a token that will represent us
/// whenever we make any call to the API.
/// </summary>
/// <param name="authCode">An authentication code that lets the API know that we have permission from the
/// user to access their data.</param>
public static void SetAuthToken(string authCode)
{
    if (string.IsNullOrEmpty(authCode))
    {
        MessageBox.Show("Authorization was not provided.");
        return;
    }

    // this is all done with RestSharp!
    var client = new RestClient(OAuthConfiguration.TokenUrl);
    // make sure to read the documentation, it will tell you the request's type.
    var request = new RestRequest() { Method = Method.POST };
    request.AddHeader("Content-Type", "application/x-www-form-urlencoded");
    request.AddHeader("Accept", "application/json");
    request.AddParameter("grant_type", "authorization_code");
    // here we send them the code we obtained through the browser
    request.AddParameter("code", authCode);
    // our redirect url so the API can know where to respond
    request.AddParameter("redirect_uri", OAuthConfiguration.RedirectUrl);
    client.Authenticator = new HttpBasicAuthenticator(OAuthConfiguration.AppKey, OAuthConfiguration.AppSecret);
    // the OAuth token class contains the properties to be filled by the API's response.
    // it changes depending on the API.
    var response = client.Execute<OAuthToken>(request);
    // the deserialized response data sent by the api!
    AuthToken = response.Data;
}
And that’s pretty much it!
Hopefully it’s understandable and helpful to anybody out there in need of a bit of help implementing OAuth.
🦊✨ Make sure to check out the full code here, there’s a small gift in the OAuthCalls class: https://gitlab.com/camelopardo/oauth2example
Sources
- https://deanhume.com/a-simple-guide-to-using-oauth-with-c/
- https://stackoverflow.com/questions/20353702/how-to-create-facebook-oauth-in-wpf-c-sharp
- http://dkdevelopment.net/2010/05/18/dropbox-api-and-restsharp-for-a-c-developer/
- https://www.digitalocean.com/community/tutorials/an-introduction-to-oauth-2
- https://stackoverflow.com/questions/40761937/c-sharp-web-api-deserialzation-with-alternative-name-not-working?noredirect=1&lq=1